Tuesday, 11 February 2020

Easy Grilled Vegetables Healthy

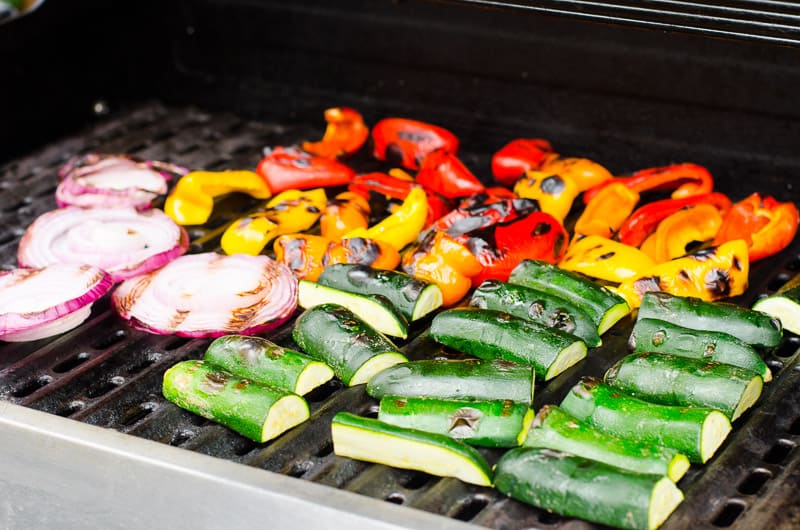
Balsamic Grilled Vegetables

Grilled Vegetables in a serving dish garnished with parsley

Grilled Vegetables Recipe with any firm mixed vegetables and super delicious balsamic dressing. Serve warm or cold, no marinade required, how to make healthy grilled vegetables video included. A sure crowd pleaser!


Ingredients

  • 1 lb zucchini, sliced lengthwise into shorter sticks
  • 1 lb bell peppers, sliced into wide strips
  • 1 large red or white onion, cut into 1/2 inch thick rounds
  • 1/3 cup Italian parsley or basil, finely chopped
  • Cooking spray (I use Misto)
Balsamic Dressing:
  • 2 tbsp olive oil, extra virgin
  • 2 tbsp balsamic vinegar
  • 2 garlic cloves, grated
  • 1 tsp salt
  • Ground black pepper, to taste

Instructions

  1. In a small bowl, whisk together olive oil, balsamic vinegar, garlic, salt and pepper. Set aside.
  2. Preheat grill on low heat and spray with cooking spray.
  3. Place vegetables in a single layer on the grill, close the lid and cook for 12 minutes, flipping once.* Vegetables should be tender to the touch, with nice grill marks. Cook longer if you like softer vegetables.
  4. Transfer vegetables to a large bowl, pour balsamic dressing on top, sprinkle with parsley/basil and gently mix.
  5. Serve hot, warm or cold with grilled meat or seafood, and a side of quinoa or brown rice.
To make ahead, you can cut up vegetables, place in a large bowl or container, cover tightly with plastic wrap and refrigerate for up to 3 days. Because vegetables contain a lot of moisture, they will not dry out.
May I say that these balsamic grilled vegetables leftovers taste even better the next day and cold?! I guess they marinate in the oil and vinegar dressing and get extra flavorful. Refrigerate for up to 3 days.
Grilled too many? You can always add leftover veggies at the very end to a soup like vegetable soup.

Vegetable Recipes for Diet

EASY LOW CARB & KETO COLESLAW RECIPE

Image result for EASY LOW CARB & KETO COLESLAW RECIPE

Image result for EASY LOW CARB & KETO COLESLAW RECIPE

Image result for EASY LOW CARB & KETO COLESLAW RECIPE


Image result for EASY LOW CARB & KETO COLESLAW RECIPE


Ingredients

  • 14 oz bag coleslaw mix a 12-16 oz bag will work fine
  • 1/2 cup mayo
  • 1.5 tbsp Powdered Monk Fruit Erythritol
  • 3 tbsp apple cider vinegar
  • 1 tsp salt
  • 1/2 tsp black pepper
  • 1/2 tsp celery seeds
  • 1/4 tsp garlic powder
  • 1/4 tsp onion powder optional

Instructions
Mix all of the ingredients for the dressing
Add the coleslaw mix. You can serve immediately, but this tastes best when refrigerated for at least 2 hours.

Healthy Recipes Steak

Salisbury Steak Meatballs - (Free Recipe below)

Image result for Salisbury Steak Meatballs - (Free Recipe below)


Image result for Salisbury Steak Meatballs - (Free Recipe below)

Image result for Salisbury Steak Meatballs - (Free Recipe below)

Ingredients

  • 2 pounds Ground Beef
  • 3/4 cups Seasoned Breadcrumbs
  • 1/4 cup Brown Mustard
  • 1/4 cup Ketchup
  • 1 teaspoon Powdered Beef Base Or Crumbled Beef Bouillon Cubes
  • 1 Tablespoon Worcestershire Sauce
  • 1/2 teaspoon Salt
  • 1/2 teaspoon Black Pepper
  • 1 whole Half Stick (1/4 Cup) Land O' Lakes Salted Butter
  • 1 whole Large Onion, Halved And Sliced
  • 2-1/2 cups Beef Broth
  • 1 Tablespoon Worcestershire Sauce (addition)
  • 1 Tablespoon Ketchup (additional)
  • 2 Tablespoons Cornstarch Mixed With A Little Beef Broth To Make A Thin Paste
  • 1 teaspoon Kitchen Bouquet (optional)
  • 1 pound Egg Noodles, Cooked To Al Dente And Drained
  • Minced Fresh Parsley

Preparation Instructions

  1. To make the meatballs, combine the first 8 ingredients in a mixing bowl and knead until completely combined. Form into medium-sized meatballs and place on a plate.

  2. Heat a large skillet or dutch oven over medium heat, and then add 2 tablespoons of Land O Lakes® Butter. When melted, add half the meatballs and gently move around the pan to brown. When brown, remove them to a clean plate and repeat with the rest of the meatballs.

  3. In the same skillet, add the onions and cook for 3-4 minutes, until golden brown and starting to soften. In a small bowl, mix ½ cup of beef broth with the cornstarch.

  4. Next add to the skillet 2 cups of the beef broth, Worcestershire sauce, ketchup, and mustard. Stir to scrape the bits off the bottom of the pan. Bring to a gentle boil and add the cornstarch mixture. Return the meatballs to the pan, reduce the heat to low, and allow them to simmer in the sauce for 10 minutes or until meatballs are done and sauce is thick. (Splash in more beef broth if needed for thinning.) To give the sauce a deeper color, add a little Kitchen Bouquet.

  5. Serve meatballs and sauce over a platter of egg noodles, tossed in the remaining 2 tablespoons of Land O Lakes® Butter and sprinkle with minced parsley.


Recipe note: Sauce should be thick and glossy!

Valentine Dinner Ideas Family

Cute Valentine’s Day 


Oh,  Sweet Basil has an amazing Red Velvet Churros + 2 dips recipe. If you love churros, you’ll love these!

Cute Valentine's Day Treats

Valentine's Day Cookies on a plate.


Cute Valentine Treat Ideas


Valentine's Day Cute Treat Ideas


Cute Valentine's Day Treat Ideas

Valentine's Day desserts


Cute Valentine Treat Ideas


Valentine treat ideas


Cute Valentine's Day Treat Ideas


Cute Valentine's Day Treats


Recipes Noodles Vegetarian

Vegetarian Ramen with Dragon Eggs


a bowl of vegetarian ramen soup with chopsticks, a bowl of chile paste, and a bowl of soft boiled eggs

a bowl of vegetarian ramen with dragon eggs and chopsticks


Ingredients
Dragon Eggs
  • 6 large eggs
  • 1/2 cup soy sauce or tamari
  • 1/2 cup cold water
  • 1 tablespoon molasses
Vegetarian Ramen
  • 1 tablespoon vegetable oil
  • 1 small yellow onion, chopped
  • 4 cloves garlic, minced
  • 3 teaspoons minced ginger or ginger paste
  • 1 tablespoon rice vinegar
  • 1 ounce dried mushrooms
  • 8 cups vegetable stock
  • 2 tablespoons soy sauce or tamari
  • 1 tablespoon white miso
  • 2 cups chopped leafy greens, I used spinach
  • 8 ounces dried ramen noodles, I like Simply Asia brand, cooked according to package directions
  • Green onions, sliced (optional)
  • Micro greens, optional
  • Sambal Oelek, optional
  • Black sesame seeds, optional
Instructions
Dragon Eggs
  1. Place one cup of water in your Instant Pot. Insert the rack that comes with your Instant Pot.
  2. Carefully place the eggs on the rack, being sure none of them go into the water.
  3. Seal the Instant Pot, making sure the valve is set to seal, and set to low pressure for 3 minutes.
  4. As soon as the eggs are done cooking, immediately quick release the steam valve.
  5. As soon as it is safe to do so, open the Instant Pot and use tongs to transfer the eggs to a temperature safe bowl. Place the bowl under cold running water until the eggs are cooled.
  6. While the eggs are cooling, combine 1/2 cup soy sauce, 1/2 cup cold water, and 1 tablespoon molasses in a wide bowl.
  7. Gently crack the outsides of the eggs in a few spots and place them in the soy mixture, turning over to coat if not completely submerged. Cover and refrigerate 10-24 hours.
  8. Once you’re ready to serve the eggs, remove the eggs from the soy mixture and remove the shells completely. Cut in half and nestle into soup bowls on top of ramen.
Vegetarian Ramen
  1. Heat 1 tablespoon vegetable oil in a large pot or dutch oven over medium heat.
  2. Add the onion, garlic, and ginger and cook, stirring frequently, until softened and just beginning to brown, about 5 minutes.
  3. Add 1 tablespoon rice wine vinegar and cook for another minute, stirring, until cooked off.
  4. Add the dried mushrooms, 8 cups vegetable stock, and 2 tablespoons soy sauce. Bring to a boil, then reduce to a simmer and allow to cook, stirring occasionally, for at least one hour. Remove from the heat.
  5. If your dried mushrooms are large, remove them with a slotted spoon, roughly chop, and return to the pot.
  6. Add 1 tablespoon white miso and stir to combine.
  7. Add 2 cups roughly chopped spinach and stir until wilted.
  8. Add the cooked ramen noodles and stir to combine.
  9. Spoon ramen into bowls and top with dragon eggs, sliced green onions, micro greens, sambal oelek, and black sesame seeds if desired.
Notes
 Instant Pot Instructions
Set Instant Pot to sauté and add vegetable oil.
Add onion and garlic and cook, stirring, for 3 minutes. Add ginger and cook, stirring, one minute more.
Add the rice wine vinegar and cook, stirring for one minute.
Add dried mushrooms, 6 cups vegetable stock, and soy sauce. Seal and set to 15 minutes on high pressure.
Once done, do a quick manual release and proceed with the recipe as directed.
 
To make soft boiled eggs on the stovetop
Bring a few inches of water to a boil in a pot, reduce to a simmer, and add eggs to cook for 6-7 minutes before proceeding with the recipe.

Monday, 10 February 2020

Cookies Ricotta

Orange Ricotta Cookies 


Image result for orange ricotta cookies

Image result for orange ricotta cookies


A close up shot of an orange blossom with cookies blurred in the background on a wooden cutting board.


INGREDIENTS

  • 1 cup butter (2 sticks) softened
  • 2 cups granulated sugar
  • 2 eggs
  • 15 ounces Ricotta cheese (whole milk)
  • 1 teaspoon vanilla extract or vanilla bean paste
  • 1/4 teaspoon orange extract
  • Zest of one orange
  • 4 cups all-purpose flour
  • 2 teaspoons baking powder
  • 1 teaspoon salt

GLAZE

  • 2 cups powdered sugar
  • 4–5 tablespoons orange juice
  • 1 teaspoon vanilla extract or vanilla bean paste
  • 2–3 drops orange extract

INSTRUCTIONS

  1. Preheat oven to 350 degrees.
  2. In the bowl of an electric mixer, cream together butter, sugar and eggs on medium speed.
  3. Add Ricotta cheese and mix until smooth. Add vanilla extract, orange extract, and orange zest and blend.
  4. In a medium bowl, mix flour with baking powder and salt.
  5. Gradually add the flour mixture to the wet ingredients on low speed until a dough is formed.
  6. Drop the dough by tablespoons onto a baking sheet. Bake for 11-12 minutes. Cookies will just be starting to get golden around the bottom edges.
  7. Remove from baking sheet and place on a cooling rack with parchment paper underneath.
  8. Spoon glaze onto cookies or turn cookies upside down and dip the top of the cookie into the glaze. Allow the glaze to fully set before storing.
  9. GLAZE
  10. Whisk together powdered sugar, orange juice, vanilla extract or paste, and orange extract in a small bowl until smooth. Start with 4 tablespoons of orange juice and add more as needed. The glaze should run off the end of a fork in a ribbon (not drips) when it is the right consistency.

Homemade Apple Pie Cookies

APPLE PIE HAMANTASCHEN COOKIES


Image result for APPLE PIE HAMANTASCHEN COOKIES

Image result for APPLE PIE HAMANTASCHEN COOKIES


Image result for APPLE PIE HAMANTASCHEN COOKIES


Image result for APPLE PIE HAMANTASCHEN COOKIES

Ingredients
For shortbread

  • 228 grams (1 cups) Unsalted butter
  • 250 grams (2.08 cups) Powdered sugar
  • 1 tsp (1 tsp) Salt
  • 2 tsp (2 tsp) Vanilla extract
  • 1 large (1 large) Egg plus
  • 1 (1 ) Egg yolk
  • 320 grams (2.56 cups) All-purpose flour
  • 60 grams (0.47 cups) Cornstarch
Apple Pie Filling
  • 4 large (31.46 oz) Apples – diced granny smith or golden delicious
  • 4 tbsp (0.22 cups) Brown sugar
  • 1 tbsp (1 tbsp) Lemon juice
  • 1/2 tsp (0.5 tsp) Salt
  • 1 tbsp (1 tbsp) Vanilla
  • 1/2 tsp (0.5 tsp) Cinnamon
  • 2 tbsp (2 tbsp) Cornstarch
Egg wash
  • 1 (1 ) Egg yolk
  • 2 tbsp (2 tbsp) Water
  •  
 
Instructions
Prepare the shortbread dough
  1. Cream butter and powdered sugar until light and creamy.
  2. Add the egg and egg yolk one at a time.
  3. Then add the salt and vanillaLastly, fold in the flour and cornstarch. Combine well.
  4. Divide into two and wrap well in cling/plastic wrap for at least 2 hours or until firm enough to roll.
Prepare Apple Pie Filling
  1. Add all filling ingredients in a heavy bottom saucepan.
  2. Heat on medium-low until the sugar melts and apples release their juices.
  3. The cornstarch will start to thicken the juices.
  4. Continue to cook on medium until almost all the juices are evaporated.
  5. Once almost all the syrup is absorbed – (almost dry) take it off the heat.
  6. The apples will continue to release some juices so take that into account.
  7. Let cool completely before filling into the cookies.
Roll and fill cookies
  1. Roll the chilled cookie dough on a lightly floured surface to about 1/8 thickness.
  2. You want the cookies thin enough so you can overlap the edges without cracking but thick enough so they won’t become too hard.
  3. Using a 3-inch or 3 1/2 inch cookie cutter, cut as many discs as you can.
  4. Place them on the cookie sheet.
  5. Add about a tbsp of filling in the center Overlap the three corners as shown in the video. Fold the first two side over at one side.
  6. Then overlap the third side under the first and under the second.
  7. At all times each side should be one under and one over the other.
  8. Sounds complicated but if you see the video its pretty simple.
Chill and bake.
  1. Once all cookies are filled – chill them in the fridge while you preheat the oven.
  2. Preheat the oven at 190 C / 374 F.
  3. Brush the cookies with egg wash.
  4. Bake for 10 to 12 minutes until the edges are lightly golden.
  5. Cool on a wire rack – then store them in a cookie jar.
Notes
Storage and variations
  • These cookies will stay fresh at room temperature for 2 to 3 days. You can keep them in the fridge for longer up to 2 weeks. Or in the freezer for up to a month.
  • I used pecans but other nuts are just as delicious – I have tried hazelnuts and macadamia using the same recipe just different nuts and they were wonderful.
  • An absolutely mesmerizing combination is ground hazelnuts and chocolate chips. Kids favorite because it reminds them of Nutella.

Cake Cookie Carrot


Carrot Cake Cookie Sandwiches 
(Vegan + Oil-Free)
overhead basket with carrot cake cookie sandwiches

carrot cake cookie sandwich ingredients over head shot

forward facing shot of carrot cake cookie sandwiches stacked up

carrot cake cookie sandwich on plater

Ingredients
Wet Ingredients
  • 2 chia eggs (2 tablespoons chia seeds + 6 tablespoons water)
  • 3/4 cup grated carrots (packed)
  • 1/2 cup creamy peanut butter* (see notes)
  • 1/3 cup pure maple syrup
  • 2 teaspoons vanilla extract
  • 2 teaspoons lemon juice or apple cider vinegar
  • 1/4 cup raisins* (see notes)
Dry Ingredients
  • 2 cup gluten-free rolled oats
  • 1/4 cup walnuts
  • 1 1/2 teaspoons baking powder
  • 1 1/2 teaspoons ground cinnamon
  • 1/2 teaspoon baking soda
  • 1/4 teaspoon salt
Filling
  • 2/3 cup plain vegan cream cheese* (homemade or store bought; see notes)
  • 1/3 cup + 1 tablespoons powdered sugar
  • 1 teaspoon vanilla extract
  • 1 to 1 1/2 teaspoons lemon juice (optional)

Instructions
  1. In a small bowl, prepare the chia egg by mixing 2 tablespoons of chia seeds with 6 tablespoons of water. Stir together and set aside for 10 minutes to thicken.
  2. In the meantime, add 1 cup of rolled oats to the bowl of a food processor. Process the oats until they have formed a flour-like consistency. Add in the walnuts and pulse until they are chopped but not fine. Transfer the oat and walnut mixture to a large bowl and add in the remaining rolled oats along with the baking powder, ground cinnamon, baking soda, and salt. Mix until everything is well combined.
  3. Into the same bowl, add the carrots, creamy peanut butter, maple syrup, vanilla extract, lemon juice, raisins, and prepared chia egg. Mix everything together until it is well incorporated. Place the bowl into the refrigerator to chill for 30 minutes.
  4. In the meantime, prepare the filling. In a small bowl, whisk together all of the ingredients for the filling until smooth. We recommend starting with 1 teaspoon of lemon juice (if using) and adding more as desired. Taste and adjust the sweetness from the sugar or the tang from the lemon, to taste. Transfer this mixture into a (sealed) piping bag and place that bag into the refrigerator to chill.
  5. Preheat the oven to 350°F and line a baking sheet with a silicone baking mat or parchment paper. Using a tablespoon sized scooper, scoop 1 tablespoon of the cookie dough into your hand and roll it into a ball. Flatten the ball out into a 1/3″ tall cookie, being sure to smooth out the sides. Place the cookie onto the baking sheet and continue until you have measured out all of the dough. Keep in mind that these cookies will not expand so you can keep them fairly close together (1/2-inch or so apart).
  6. Place the cookies into the oven and bake for 16-18 minutes, or until the bottom has browned. Remove from the oven and cool completely.
  7. Once the cookies have cooled, assemble the sandwiches. Remove the filling from the refrigerator and pipe the icing onto the bottom of one cookie in a circular fashion (from the outside in). Place a second cookie on top and gently twist it to “seal” it onto the filling. Continue until you have filled all of the cookies. Enjoy!

Healthy Bento Recipes

Fun, Snacky Lunches for Grownups


This Chicken & Hummus Plate Lunch Meal Prep is so simple yet incredibly delicious! Healthy food recipes for weight loss minimaldesign.


Chocolate With Pudding

HOMEMADE CHOCOLATE PUDDING PIE WITH BROWNIE CRUST

Homemade-Brownie-Bottom-Chocolate-Pudding-Pie


Homemade-Brownie-Bottom-Chocolate-Pie


Homemade-Brownie-Bottom-Chocolate-Pie

Homemade-Brownie-Bottom-Chocolate-Pie

Ingredients
Chocolate Pudding from Scratch
  • 4 ounces bittersweet chocolate
  • 3 Tablespoons cocoa powder (unsweetened)
  • 3 Tablespoons corn starch
  • 1/4 teaspoon salt
  • 1 cup heavy cream
  • 3 egg yolks
  • 2 1/2 cups 2% milk (or whole milk)
  • 1/2 cup brown sugar
  • 1 1/2 teaspoons vanilla extract
Brownie Crust
  • 4 ounces semi-sweet chocolate
  • 4 Tablespoons salted butter
  • 3/4 cup sugar
  • 1/8 teaspoon salt
  • 2 eggs
  • 1 teaspoon vanilla extract
  • 1/2 cup all-purpose flour
Whipped Cream
  • 1 cup heavy cream
  • 2 Tablespoons confectioners sugar
  • 1/2 teaspoon vanilla extract
Garnish
  • 1 square of semi-sweet chocolate to make curls

Instructions
  1. Make your pudding first, since it will need to chill for up to three hours. Chop your bittersweet chocolate into fine flakes with a serrated knife.
  2. In a large, heat-proof bowl, whisk together your cocoa, corn starch and salt. Gradually add the cream, whisking as you go until it's smooth. Whisk in your eggs.
  3. In a 3-quart or larger saucepan, add your milk. Stir in the sugar and warm it over medium heat. Bring the pot to a simmer. You will see tiny bubbles covering the surface of the liquid.
  4. When it has reached a simmer, pour most of the hot liquid into your bowl with the cocoa and corn starch mixture. Whisk until it is blended well. This will temper the eggs, so they don't scramble.
  5. Pour everything from your bowl back into the pot and increase your heat to medium high. Whisk constantly as you bring the pot to a full boil. The pudding will be thicker.
  6. Cook the boiling pudding for two minutes, whisking constantly and vigorously, making sure to reach the corners of your pot.
  7. Remove the pudding from the heat and stir in your vanilla. Add the chopped chocolate and whisk the pudding well until the chocolate is blended.
  8. To chill the hot pudding more quickly, spread it evenly onto a sheet pan with sides. Cover the entire surface of the pudding with wax paper, pressing it onto the pudding to prevent skin from forming. Refrigerate for three hours. (You can check it after 1 1/2 hours to see if it's ready.)
  9. While the pudding is chilling, make your brownie crust. Preheat your oven to 350 degrees F. Grease your pie dish.
  10. In a glass bowl or other microwavable bowl, add the 4 ounces of semi-sweet chocolate and your butter. Heat it, covered, in the microwave for 1 minute and 50 seconds, or until the butter is melted. Stir to combine.
  11. Stir in your sugar and salt. Then stir in your eggs and vanilla. Finally, stir in the flour.
  12. Transfer the batter to your pie dish and bake it for 20 minutes, or until a cake tester or toothpick inserted in the center of the brownie comes out with fudgy crumbs. Don't over bake it. Let the brownie crust cool on a wire rack.
  13. To make your whipped cream, beat the whipping cream and confectioners sugar in a clean, medium stainless steel bowl with a mixer until the cream is about half way to being stiff. Add in the vanilla extract and continue beating until stiff peaks form. Refrigerate the whipped cream until the pudding is chilled enough to assemble the pie.
  14. To assemble the pie, make sure your brownie crust is at room temperature. Add the chilled pudding on top of the brownie crust. Top the pudding with your whipped cream. To make chocolate curls for the garnish, use a vegetable peeler to peel along a straight edge of your chocolate square. Make as many curls as you wish and scatter them on top of the pie.
  15. Serve or refrigerate the pie for later, covered with a domed bowl or domed foil so that it doesn't touch the topping.

Keto Pizza Bites Delish

Easy Keto Pizza Bites (Plus Calphalon Muffin Pan Giveaway!)

Pizza is another food you may find yourself craving. In this case, though, the alternative is far better than the original; these little bite-sized treats pack all the best parts of pizza, without the carb-laden crust. Even better, they’re easily customized to fit your favorite pizza flavors! These easy keto pizza bites are super fast...Read More


INGREDIENTS
12 slices pepperoni slices while you can substitute smaller slices, you really will prefer large slices
12 mozzarella balls mini-sized
12 basil leaves fresh
12 toppings preferred
seasonings to taste

INSTRUCTIONS

  1. While preheating the oven to 400 F, line 12 cups of a mini muffin tin with your pepperoni slices. While smaller slices can be layered, they really do fit and work so much better with large slices. (And to help aid that fit, you can make a few slits in the pepperoni slices from the edge toward the center to help the slices better fold and conform to the edges of the muffin tin.)
  2. Bake 5 minutes before removing from the oven—though leave the oven on. Let cool 5-10 minutes, so the pepperoni can crisp back up.
  3. In each muffin space, spoon ½ teaspoon of tomato paste into the bottom, layering it smoothly on top of your pepperoni cup. Follow up with a mozzarella ball and basil leaf in each cup, as well as any additional seasonings as you see fit. Return the muffin tin to the oven, baking another 3-5 minutes to let the cheese melt appropriately.
  4. Remove your muffin tin from the oven and let cool 5-10 minutes before serving; use caution, as the cheese will likely still be quite hot.